


New Year, New Sweets
It’s a new year which means a clean slate, annnnnd a whole new year of birthdays and parties and celebrations to figure out. Which can be exciting, and also overwhelming if your schedule is already starting to fill up, but don’t worry! We’ve done some of the heavy lifting for you and come up with four simple but impressive dessert options for your next festivities – whether you’re looking to create a whimsical themed sweet table, or just want a couple quick hacks to dress up some store bought goodies into something a little more special.
How-to: Level Up Store Bought Donuts
Transform a box of plain donuts in just a few minutes- whether you grab them from the grocery store or pick them up from your favorite bakery.
- Melt a bowl full of chocolate wafers in the microwave and dip one side of each donut in,
- Cut the edges off of one marshmallow per donut to make them a more aesthetic square, annnnd to expose more of the soft gooey interior. Place a marshmallow square on the chocolate side of each donut, and feel free to eat those leftover marshmallow scraps as a little chef’s treat.
- Grab a clean baking paint brush and brush golden luster dust around the entire chocolate side of the donut. Nothing takes a store bought goody to the next level faster than some edible gold dust. Instant glam!
- Now, if you’re happy with these donuts at this phase, feel free to serve and enjoy! If you want to kick them up one more notch however, grab a kitchen torch and torch the tops of those marshmallows for a perfectly caramelized, s’mores-y finish.
How to: Paint a Birch Tree Stump Cake
Winter birthday themes may not seem as natural as a summer pool party- but a gorgeous woodland theme is easy to pull off and this Birch Tree Stump Cake is a perfect central dessert to anchor a sweets table. Or make it on it’s own for a completely unique take on cake.
- Bake up a batch of your favorite chocolate cake or use a box mix (a totally valid shortcut! No shame!) to create two or three round pans full of cake.
- Frost the entire cake-both the exterior and in between the layers with our Whimsical White Buttercream. Chill the cake in the fridge or freezer while you get out our Black and Brown gel colors, a skinny paint brush and a fat paint brush (best to use clean brushes specifically designated for kitchen use, of course) to commence the decorating.
- Start with the sides of the cake- use the skinny brush and black gel color to draw thin lines- you can follow the example video or just freestyle it. Then splay out the fat brush with the brown gel color to add more detailing. Mix and match your shades and strokes to get a natural birch look.
- For the top of the cake- use the fat brush to create the large rings with brown coloring. Then take the skinny brush and make smaller detail rings with a darker brown (which you can get by mixing the black and brown colors together).
- And that’s it! No fancy piping skills or decorating tools required.
How-to: Easy Woodland Sweet Table
To create your very own woodland themed party sweet table, decorate with pinecones, greenery and wooden plates and trays. Anchor your table around your stunning birch tree stump cake, feature your amazing leveled-up gold marshmallow donuts, and pick a couple more treats to feature. Here are a few we love, but feel free to make it your own!
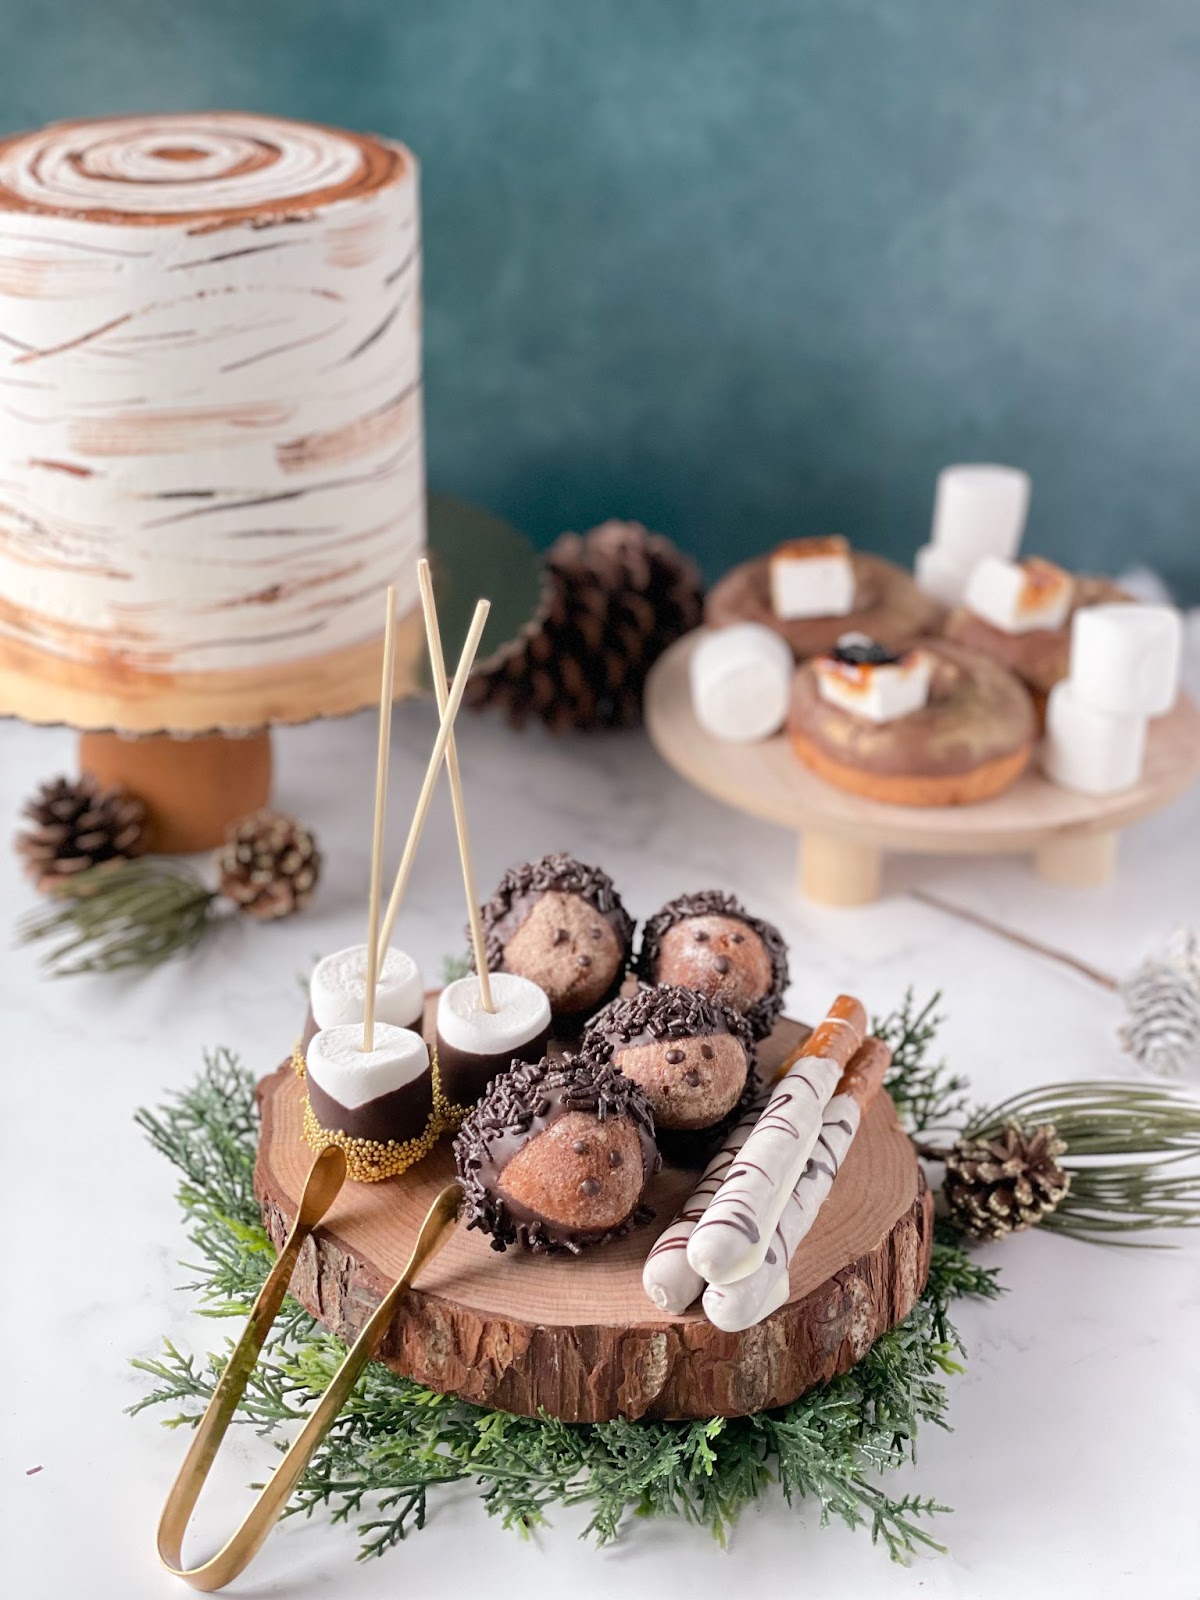
Hedgehog Donut Holes
A cute mini take on the store bought donut hack, level up your plain donut holes by:
- dipping one side in melted chocolate wafers, then immediately covering that same side in chocolate Jimmies (sprinkles) to create the perfect hedgehog “spikes”.
- Then toss your leftover melted chocolate into a piping bag (if it’s gotten too hard just pop it back into the microwave for a few seconds first) and pipe an adorable little face on the plain side of the donut hole. So simple, so good.

Gourmet Dipped Marshmallows
These ones are so fun because they are endlessly adaptable, and what’s an outdoor themed party without a celebration of s’mores, right?
- Stick one of our fun party straws into a marshmallow, being careful not to poke through the other side.
- Dip the marshmallow into a bowl of melted chocolate melting wafers- it doesn’t have to cover the entire thing. Then, dip the chocolate covered mallow into your favorite sprinkles – we love golden Nonpareils, but the sky is truly the limit here.
If you’re hosting older kids or adults, this is a great treat to turn into a “make it yourself” station, with lots of sprinkle options so people can customize their dipped marshmallows however they’d like.

Pretzel Birch Tree Branches
It may be nice to have a little salt to offset all this sweet, so these Pretzel Birch Tree Branches are a great final touch.
- Melt a bowl of white chocolate melting wafers and one of milk chocolate melting wafers in the microwave.
- Pour the white chocolate into a tall glass, and the milk chocolate into a piping bag with a small tip snipped off.
- Dip large pretzel rods (the thick kind) into the white chocolate, then drizzle them with the milk chocolate to create a funky, artsy branch look.
This can also be a fun DIY station at the party, just make sure someone is keeping an eye on the melting wafers and popping them back in the microwave as needed.

Cake Hack: Redecorating a Store Bought Cake
Our final hack is one of our favorites. Buy a store bought cake, scrape off their terrible icing, and redecorate that thing to your heart’s content.
**The key** is making sure the cake is COLD first, like, really, really cold. We recommend chilling it in the freezer for at least a few hours before scraping off the store’s frosting.
The leftover base icing/frosting left on the cake can serve as your crumb coat- so you can get straight to the pretty exterior. You can do absolutely anything on this cake- it’s a great way to test out new techniques or replicate something you saw on Pinterest without having to spend hours on the basics.
Snow Themed Cake Redecorating
Our snow themed cake hack used our Whimsical White Buttercream, whipped up with ¼ tsp blueberry flavoring and our Berry Blue buttercream to make a vibrant bright blue color.
Then in a second bowl, add some of the blue buttercream to more white buttercream to get a lighter blue, so you can create a subtle ombre on the side of the cake (lighter on the bottom, darker on the top).
To create stunning edible stars, we filled star molds with melted white chocolate melting wafers and let them cool before adorning the top of the cake. Then you can use whatever buttercream you have left to pipe on more embellishments. And finish with our snowflake sprinkles for the ultimate winter wonderland touch.
Holiday Treats
There’s no better time than the Holidays to get cozy in the kitchen. There’s just something special during this time of year about baking for loved ones and baking with loved ones. But…it also tends to be a busy and overwhelming season, and we totally get that, so we’re here to help! Whether you’re looking for an easy to achieve sugar cookie set, or a shareable festive treat your kids will love, here are some of our top Holiday baking tips to keep the season jolly. And delicious, of course. Happy Holidays, and happy baking!
How To: Cupcake Wreath
A cupcake wreath is perfect for germ-free sharing, no cake cutting required! Whether you need a treat for a kid’s classroom or a grown up party, this wreath is a hit with all ages. It doubles as a centerpiece and single serve desserts all at once, with no need for a knife or serving plates.
Bake (or buy) a batch of your favorite cupcakes- we added green gel coloring to our vanilla batter, but you can go simple with vanilla or chocolate if you’d prefer.
While they bake and cool, whip up some of our ready-to-use garden green buttercream with a hand or stand mixer, and transfer it into a piping bag with an open star piping tip.
Create easy, sparkly leaves to adorn your cupcake wreath by lightly spraying ripped up pieces of rice paper wraps with water, letting them dry, then dry brushing them with our peridot green luster dust.
Arrange your cupcakes into a circle wreath shape, and pipe the buttercream around the entire circle to create fluffy buttercream “boughs”.
To add some gorgeous finishing touches- bring in fake cranberries with either small dollops of red buttercream, red candies or red dragees. Finally attach your sparkly rice paper leaves with more buttercream. And voila, it’s the perfect Christmas dessert!
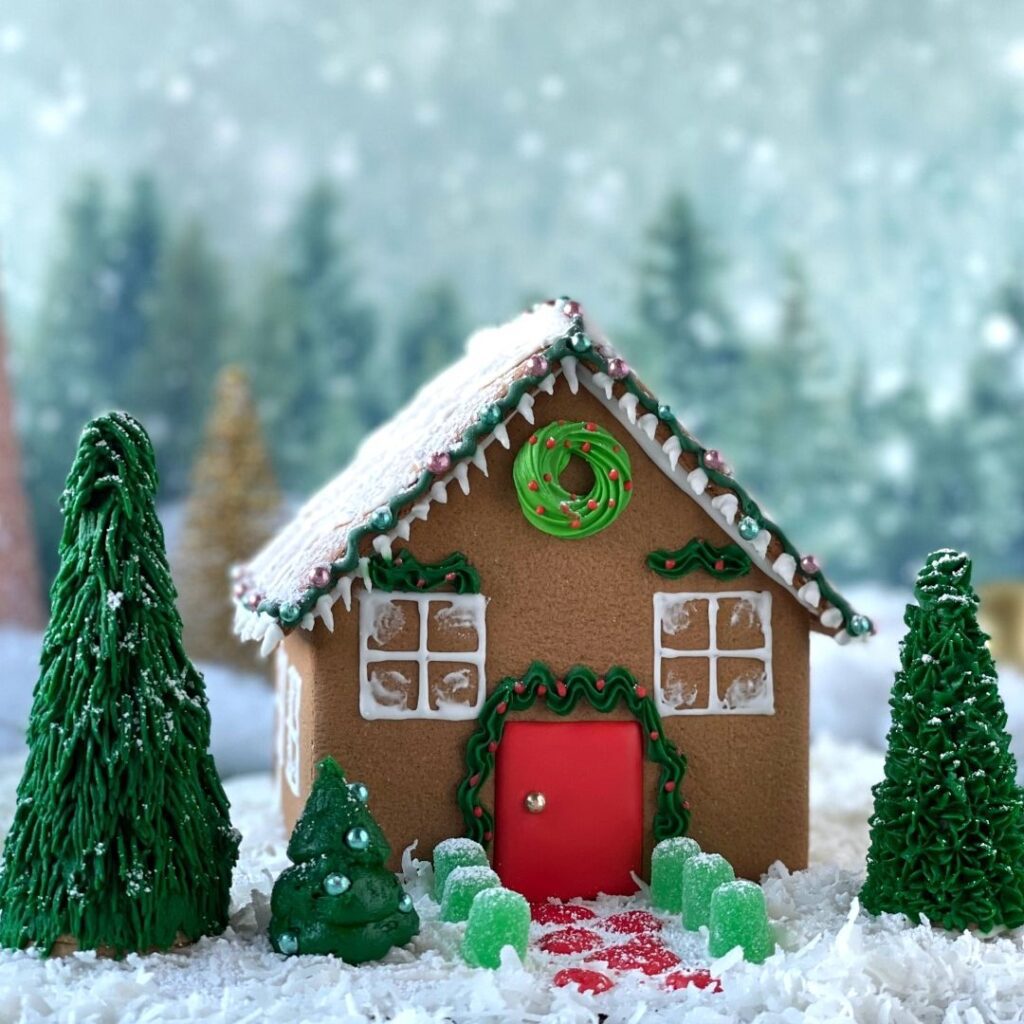
Royal Icicles
The holidays are all about making memories as a family, and decorating a gingerbread house together is one of those quintessential bonding experiences. Set up a table full of colorful sprinkles, bags of frosting, and your kid’s favorite candies and let the magic unfold.
To bring your gingerbread to the next level and practice your decorating skills alongside your kids, make a batch of royal icing. Using Celebakes meringue powder, create stiff detail icing which is perfect for snowy details and gingerbread house icicles. Simply use a piping bag to drip small icicles off the border of your gingerbread roof. Realistic, cute and edible? Yes please.
One Sweater, 4 Looks
Making a set of sugar cookies doesn’t need to be complicated, or require a million different cookie cutters. Using just one sweater shaped cookie cutter, you can create three different sweater styles, and endless looks with different designs. Use the full cutter for a big sweater version, cut out a v-neck for a second variation, and lose the arms for cute sweater vest versions.
Pick a palette of colors for your royal icing, and decorate your sweaters in whatever designs you like. Use sprinkles and dragees to add charming details like buttons and patterns to your edible wardrobe. For a more cohesive cookie set, repeat your designs, but if you feel like flexing your creative muscles a little more, feel free to make each sweater cookie it’s own work of art. Or make replicas of your friend’s and family’s signature sweaters for a truly next level Christmas treat.
4 Ways to Dragee
Dragees are a holiday staple- a fancy upgrade from your basic sprinkles that add glitz and glam to any baking project. Here are four places we love adding dragees to upgrade desserts.
Gingerbread house– create an edible string of “christmas lights” with colored dragees to adorn a gingerbread house or edible christmas tree.
Chocolate mousse cup– piping green colored white chocolate mousse into chocolate cups in a “Christmas tree” shape is a pretty cute festive treat on its own, but completing the look with shiny dragee “ornaments” makes these desserts feel especially elevated.
Cakelets– the cool older sister of cake pops, cakelets are an easy treat to make that seem fancy and adorning them with a couple colorful dragees is the perfect finishing touch.
Sweater cookie details – dragees are an excellent addition to your sweater sugar cookies. You can use them to create all kinds of designs, but our favorite way to use them is as cute little buttons!
Our Fall Favorites
With Thanksgiving a few weeks away and Christmas on the horizon, many of us are getting ready to host, entertain and bring some cheer to our loved ones. We’ve come up with five desserts we think you’ll love- and that won’t take full days to pull off – we know you’re busy. Edible ornaments and micro cakes you can make with your kids, s’mores hot cocoa bombs, a pumpkin pie cookie set and cookie-stuffed cakelets made with cake scraps and leftover buttercream…hungry yet? Let’s get started.
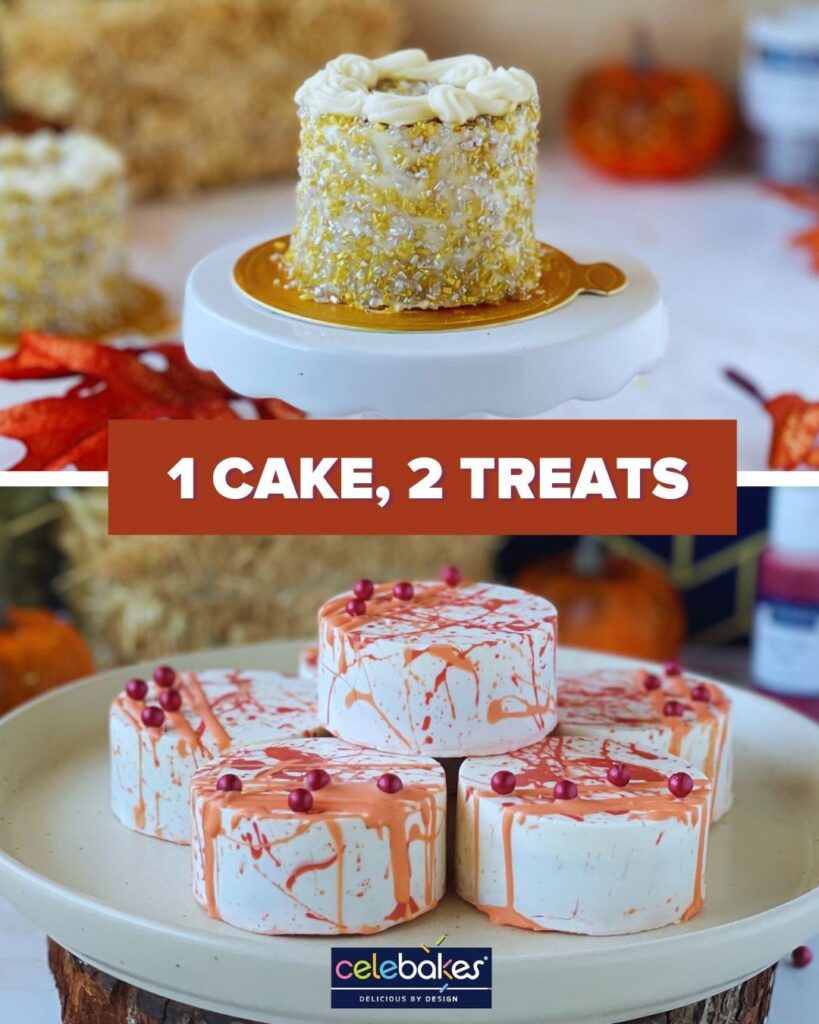
1 Cake, 2 Treats
This two-for-one recipe set saves time, doubles output and uses every last drop of ingredients, completely eliminating waste- does it get more satisfying than that?
Treat 1: Micro Cakes
Bake one layer of your favorite basic cake batter. Once the cake cools a bit, refrigerate it for a few hours or overnight to minimize crumbs. While the cake cools, whip up some of our buttercream and grab your sanding sugar.
Once the cake is cooled, cut tiny circles out with a small round cookie cutter and ice each with buttercream. Decorate the outside of the cakes by spooning sanding sugar onto them, which means you don’t have to worry about the buttercream being perfect and you can decorate them in under ten minutes!
Save your leftover cake scraps and buttercream, mix them together like you would for a cake pop and we will move on to treat number two.
Treat 2: Cakelets
Move over cakesicles, step aside cake pops, it’s cakelets season. These are a deceptively simple dessert that seem way more gourmet and complicated than they are.
Microwave white melting wafers and add some oil based candy color to a small amount, use a clean brush to splatter this colored mixture into cylinder silicone molds, then line the molds with the rest of the white melting wafers. Next stuff them with a cake/frosting “cake pop” filling, layer in an Oreo, and cover with another layer of melting wafers.
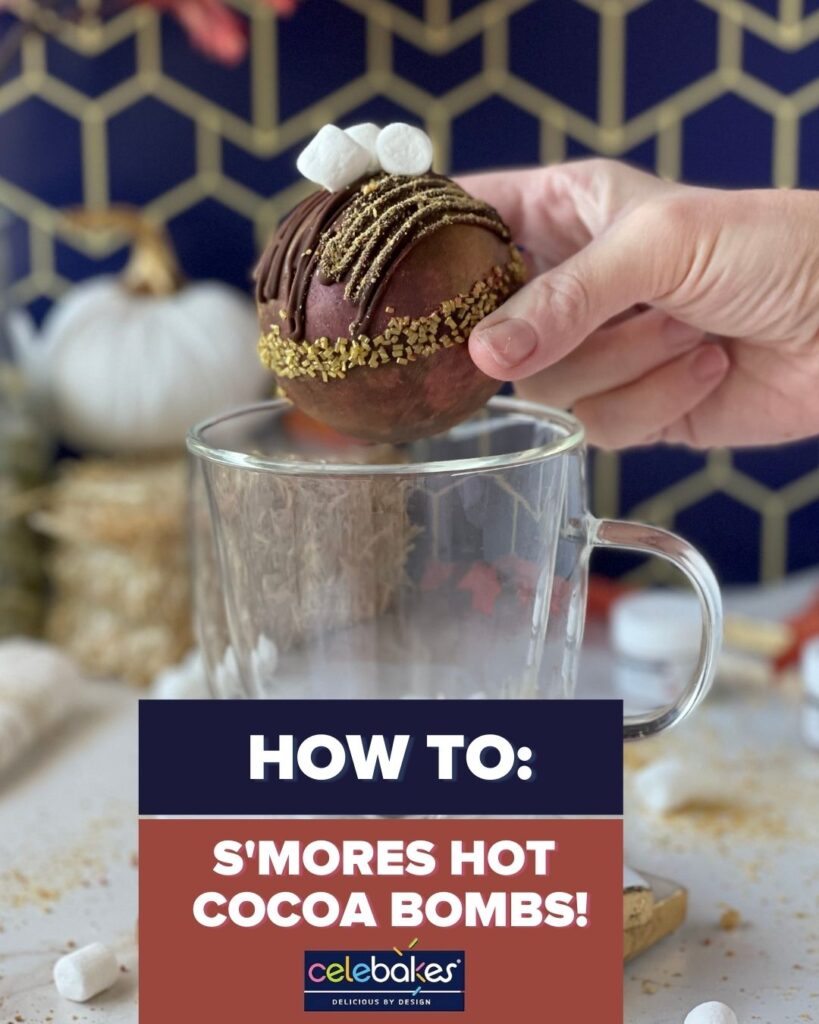
How To: S’mores Cocoa Bombs
What’s better than a comforting mug of hot cocoa? Basically nothing. Make a batch of these s’mores cocoa bombs to give as a gift or share with your loved ones!
An optional fancy touch we loved adding to these is brushing gold luster dust into the round silicone molds with a clean brush before pouring melted chocolate wafers* thinly into the silicone molds to create shell halves.
While those halves chill in the freezer, you can collect your fillings. If you don’t have any hot chocolate mix on hand, you can make your own with cocoa powder, icing sugar, milk powder + any flavor of your choice! We did a meta s’mores flavor for these by adding toasted graham cracker crumbs, but you can easily customize yours with other fun add-ins like candy canes or cinnamon sugar if that’s more your speed. Grab a few handfuls of miniature marshmallows and prep your work station. Pull your shells out of the freezer and fill half of them with your hot cocoa mix and miniature marshmallows
Using a hot plate just out of the microwave, gently melt an empty half chocolate shell, and seal it together on the filled half. You can use a piping bag with melted chocolate to seal the seam even more. Then roll the melty chocolate seam in sanding sugar for an extra special touch, and drizzle with extra chocolate, maybe adding a couple more mini marshmallows on for good measure.
*If you don’t have chocolate melting wafers and aren’t a pro at tempering chocolate, you can also make sturdy and glossy chocolate shells using chocolate chips and our paramount crystals.
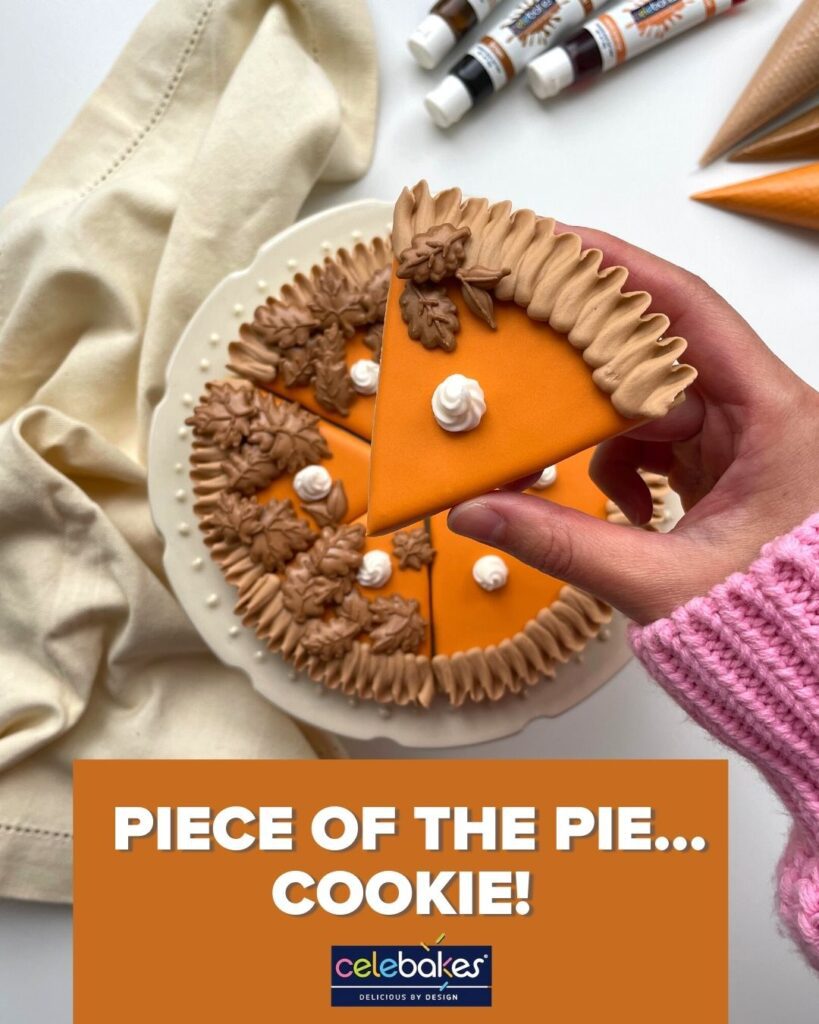
Piece of the Pie…Cookie!
Whether your family isn’t that big on pie or you’re just looking to switch things up this year, a pumpkin pie cookie is a fun way to nod at tradition while doing something a little different.
Make your “cookie pie” as big or as small as you like by rolling your sugar cookie dough into a circle and measuring- 6-inch=6 slices, 8-inch=8 slices, and customize your own template depending on how many people you’re feeding. Cut your slices before baking, and wait for the cookies to cool completely before decorating.
While your cookies cool, mix up your meringue powder and food coloring into royal icing in neon orange, brown and ivory for your pumpkin, crust, leaves made out of “crust” and “whipped cream” details. You can start by piping small brown leaves onto a piece of parchment paper or a silpat. This is also a good step to let kids help out with.
Once your cookies are cooled, you can flood your slices with orange and use whatever piping tips you have on hand to create the three dimensional textured pie crust and whipped cream details. Finish by placing some of the “crust leaves” onto the pie, and take a picture of your creation. You deserve to remember this win!
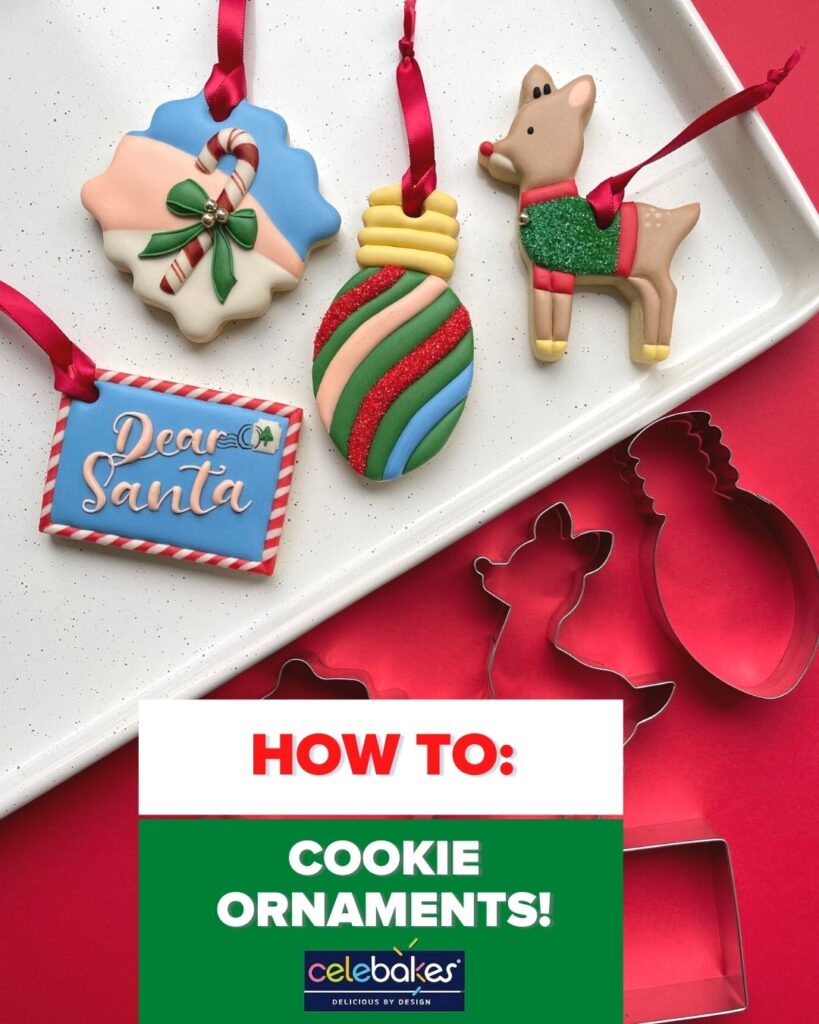
Gifts Worth Hanging
Forget the popcorn garland. This year why not adorn the tree with edible sugar cookie ornaments?
It couldn’t be simpler- make a batch of your favorite sugar cookie dough, roll it out and use holiday cookie cutters to create whatever shapes you’d like. Then comes the most important part- punching out a small hole towards the top of the cookie where you will string a ribbon. You can totally cut these holes with a knife, but any straw should work to punch out a perfect circle. Once your cookies are baked and cooled, thread the ribbon through the holes and tie a knot. Then get the whole family in on the fun and decorate away with icing, sprinkles, and edible markers!
Spooky Sweet Treats
Halloween is approaching so why not take some time to bake some delicious spooky creations? Whether you are looking to create some simple cookies or go the extra mile and create some yummy cakes. These spooky sweet treats will hit the spot with your family and friends!
Halloween Sugar Cookies
These are the only kind of pumpkins we are interested in having in our kitchen at the moment! We are in love with the pattern and kind of wish all pumpkins could look like this.
Make a batch of your favorite sugar cookie dough and then use a pumpkin shaped cookie cutter to make the perfect pumpkin. As soon as the cookies cool down pipe on your favorite Halloween designs to make the ultimate cookie sugar cookie!
To keep your patterns clear and defined use a hybrid consistency icing to hold shapes in place and define after with your scribe. Don’t worry about making them perfect with the bag!
Black Cat Bullseye Cake
What is better than sugar? Adding more sugar of course! The sanding sugar used to create the cat is a fun and easy way of adding a little sparkle to give the cake its finishing touch!
This fun cake uses two ready to use premium icing buttercreams to create a special surprise when being sliced open. It’s stacked with three layers of cake in between two buttercreams that are used to create a bullseye. Let us tell you this cake hits the mark!
Topped with delicious gallops of buttercream icing with sprinkles you can’t get sweeter than this. When we think of a Halloween cake this is the definition of it!
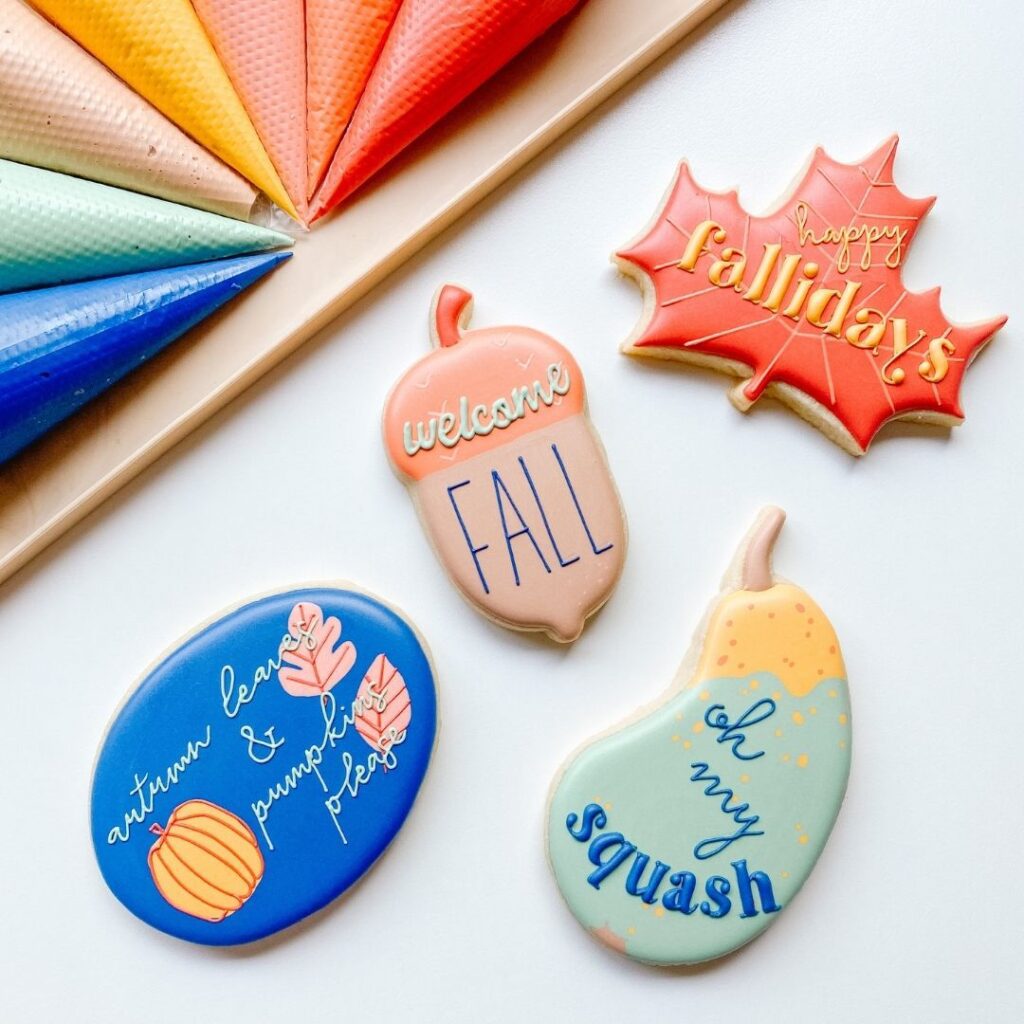
Falliday Sugar Cookies
Leaves, acorns, and squash oh my! Fall is our excuse for making falliday cookies inviting in the sweater weather! Our food color gel makes a great color set for each cookie.
Use your favorite sugar cookie dough and bake until there done. Now you’re ready to cut out and top your yummy sugar cookies! While your cookies are baking, mix your food coloring gel created as the colors you wish. As soon as your cookies have cooled completely pipe on your base colors and wait until dry.
The last steps are making your designs on your cookies and piping on the words to give these cookies that fall feel.
Candy Corn Cake
When is there a better time to be a little extra when creating a candy corn cake? If you like candy corny then you will love this cake!
Toss more butter into your buttercream. Pipe and smooth candy corny layers of your buttercream onto acetate, then transfer it directly on to the cake. Add whatever toppings and finishing touches you want.
Why not add meringue ghosts? We love a good surprise when decorating and these ghosts do the trick!
September Treat Inspo
School is back in session, the leaves are on the cusp of changing, and we’ve rounded up four baking projects you’re going to love. Whether you’re looking for something simple to do with your kids or a next-level gourmet cookie project, we’ve got you covered. So grab an apple cider, pull your scarves out of storage and let’s welcome fall flavors with these September baking challenges.
Caramel Apple Stuffed Snickerdoodle Sammies
Make a batch of your favorite cinnamon sugar cookie dough, roll each ball in sanding sugar and cinnamon and marvel at how incredible your kitchen smells while you bake them.
As soon as your hot cookies are out of the oven, put an oversized round cutter or mason jar lid over the cookie and ‘scoot’ it around into a perfect round cookie.
Flip a cookie upside down, pipe a ring of our buttercream around the edge and fill the inside with any kind of apple caramel mixture. Then top it with a second cookie, and drizzle half of the top cookie with some melted melting wafers. Finish it off with some of our gorgeous sprinkles and edible gold star glitter for a classy touch.
Shimmering Red Apple Cupcakes
Mix a batch of your favorite cinnamon spice cupcake batter. To create the apple shape simply bunch up a little ball of tinfoil, place it outside of your cupcake wrapper in the cupcake tin and adjust your wrapper around it to your desired shape. Carefully fill each wrapper with batter and bake.
While they bake, throw some white melting wafers in the microwave then mix a little green coloring powder in for the leaves, and microwave some brown chocolate melting wafers as well for the stems. Pipe out leaves and stems on a sheet of wax or parchment paper and let them set.
Once your cupcakes have cooled, use a little Rowdy Red Buttercream to attach the stem and leaf, then pipe enough strips of the buttercream to cover the whole cupcake. Finish off with a generous sprinkle of red sanding sugar for that shiny, polished apple effect!
Woodland Animal Sugar Cookies
If you’re leaning towards a cute baking project this month- these whimsical woodland creatures are the ticket.
Make a batch of sugar cookie dough and use our animal cookie cutters to shape your cookies. We went with a fox, raccoon, hedgehog and turtle for our collection, but feel free to curate your own set of woodland friends.
Using our meringue powder, create royal icing in your desired colors. Flood the cookies with your base color, then use a stiff icing consistency to pipe on details like fur and quills. Using our gel food colorings and a paintbrush, brush on shadows and definition.
Tips: The key to creating a natural color gradient is to always mix your icing lighter than your intended colour to allow for building of shadow with painting.
For example with the raccoon faces, the sections you want to be black you should be icing as a charcoal grey, shadowed with black gel colouring.
Abstract Cookie Tiles
Feeling artistic? Abstract cookie tiles are a great way to flex your modern art compulsions and experiment with different piping techniques. Mix a large batch of royal icing with meringue powder and use gel food coloring to create a number of complimentary colors so your cookie set will still feel cohesive even with different shapes and designs. We had a lot of fun playing around with Terrazzo designs and geometric patterns in Autumnal jewel tones.
If you’re looking for a decorative way to bring the set together even more, our shiny dragees add an elegant vibe and are perfect for display. Because sometimes we’re aiming for cute, and sometimes we just want to be fancy!
Back To School Treats
Whether you’re giddy about sending your kiddos back to school or clinging on to the last few weeks of summer, we have the perfect August baking inspo for you to break out your sugar cookie skills and use up those cake scraps you’ve been saving. Three of this month’s bakes are simple enough to do with the kids in your life, but have a wow factor that will look far from basic. And if you’re looking for a more customized cookie experience- our Back To School sugar cookie set is the perfect treat to celebrate teachers and the return to the classroom.
Buttercream Filled Peach Sugar Cookies
We cannot get over how cute and easy these little peach cookies are! Bake up a batch of your favorite sugar cookie recipe in round mounds. As they bake, beat our delicious buttercream on low in a stand mixer to fluff up the texture.
While the cookies are still warm, use a spoon to hollow out the inside, and then fill it in with lucious buttercream, and sandwich two cookies together to create a peach shape.
Dilute some orange gel food coloring in water and paint this mixture all over the outside of the cookie with a brush. Then roll or sprinkle the cookie with our sparkly sweet sanding sugar, and garnish with a mint sprig for the final peach leaf touch!
Emoji & Sprinkle Cake Pop Bouquet
If you freeze your cake scraps and keep a few of our pantry ingredients on hand, you can whip up cake pops as an emergency school treat or a last minute dessert.
Mix leftover cake scraps with our buttercream, roll into balls and chill. Secure each pop on one of our paper straws. Then dip into melting wafers (you can pick different color wafers or use food coloring to customize your coating colors even more) and finish off with our nonparelis sprinkles, or use a food decorating pen to draw your favorite emoji faces. And then- that’s it. Mix and match them into a cute bundle of perfect single serve treats.
Funfetti Sugar Cookie Cups
This little treat is so freaking easy but looks like a bougie bakery treat. Gently add nonpareils sprinkles to your sugar cookie dough. Arrange in muffin tins, pushing the dough down to create a little dough cup. While your cookie cups bake, color your buttercream in three of your favorite shades.
Line your three colors up vertically in your piping bag, and when your cookie cups have baked and cooled you can pipe a gorgeous rainbow swirl right into the cup. To really take it to the next level, sprinkle edible glitter over each cup, because we’re feeling fancy, friends.
Back To School Sugar Cookies
A new and delicious way to pass notes in class! Create individual messages on a simple lined paper design, with other cookies becoming pencils, crayons and rulers to add a little sweetness to this back to school season.
Our meringue powder makes royal icing a total breeze, and our gel food coloring can get you bright and bold colors- like a touch of orange in a yellow color base to achieve the ultimate school bus yellow of a crayon box.
Easy Breezy Summer Treats
From fluffy buttercream blondies to strawberries and cream pavlovas, summer time means lighter desserts and we have them all! Kid-friendly juicy fruit meringue pops and a set of pool party sugar cookies are summer treat ideas that are going to make your summer celebrations sweeter than ever!
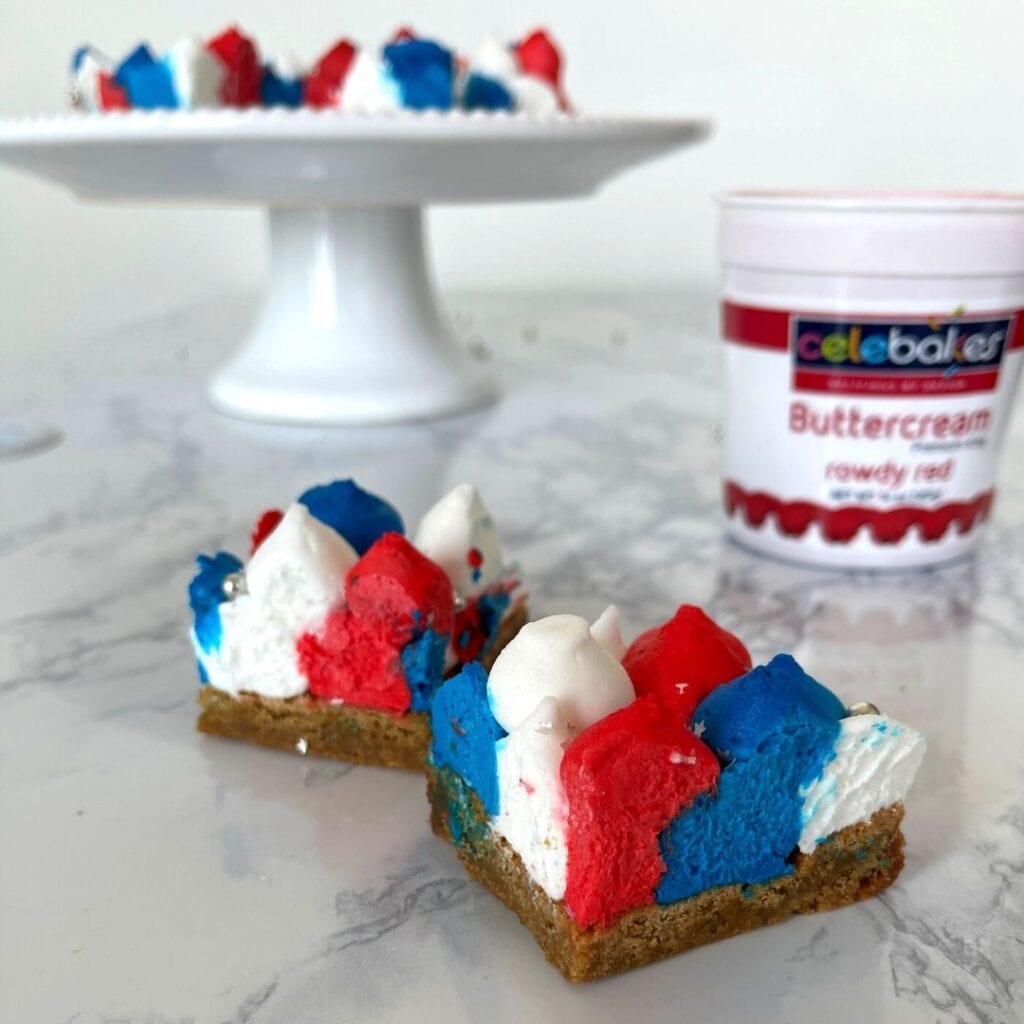
American Buttercream Blondies
These American buttercream blondies are topped high with clouds of our delicious almond-flavored buttercream on a chewy blondie base. Beat the buttercream on low for a few minutes in a stand mixer before using for that luscious texture. A silvery sprinkle of dragees and stars, and you have yourself a star-spangled stunner!
Before cutting your squares, place the tray in the freezer for 10-15 minutes before cutting, and your buttercream won’t budge. Just make sure to wipe the knife in between each cut!
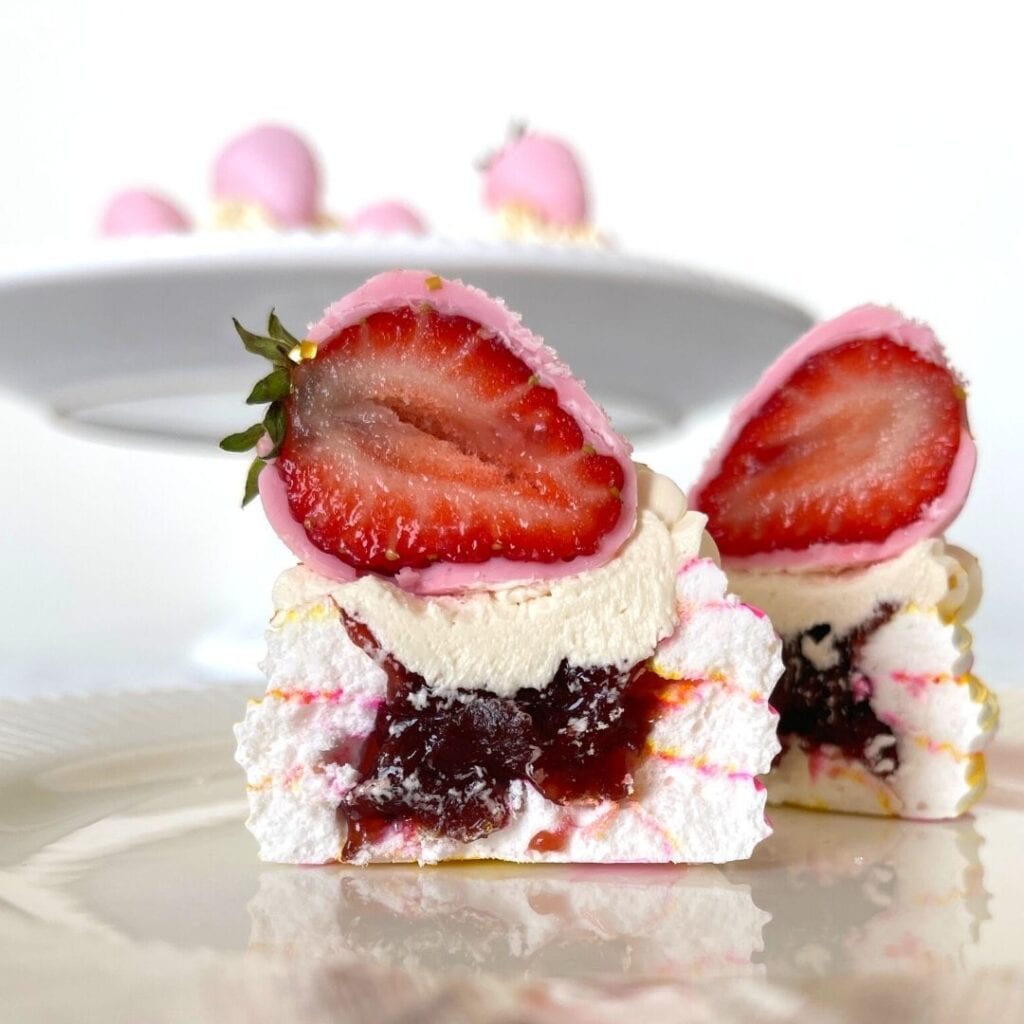
Summer Strawberry Pavlovas
Summer’s never tasted so sweet. These strawberries and cream pavlovas have the most delicious texture: they are crisp on the outside, and soft, marshmallow-like on the inside, and they will instantly melt in your mouth.
Use our meringue powder to whip up stiff, glossy peaks and stripe the piping bag with our vibrant gel colors. Our super saturated gel colors are thicker in texture, making it easy to paint bold stripes that stay bright and beautiful even after the bake!
We filled these nests with a jammy strawberry compote, and topped with a vanilla whipped cream. Oh.. and a dipped berry because, why not? Finish your mini pavlovas with a sprinkle of our sanding sugar and edible glitter for a show stopping shimmer.

Juicy Fruit Meringue Pops
Fruity meringue pops are in season and they are light and crisp. With only three ingredients, these treats are perfect for last minute BBQ’s or parties by the pool. Prepare your meringue using our meringue powder, and use our gel colors to dye the batter:
- Egg Yellow + Neon Green for the pineapple
- Neon Pink + Pine Green for the watermelon
- Bright Red + Neon Green for the strawberry
Our super vibrant gel colors stay bright while baking, leaving your pops lookin’ fresh and juicy! Add a playful touch to your meringue fruits with a pop of shimmer and crunch with our sanding sugar, nonpareils, and jimmies sprinkles!
Pool Party Cookies
Make a splash with this summer cookie set! We colored our ready-to-use royal icing with teal, yellow, pink and white to pipe this poolside party scene. Our versatile gel food colors can be used as cookie “paint” – just mix with a splash of vodka and you’re ready to take a quick dip!
Add wet-on-wet shadows to your designs with a thicker flood icing (look for a honey-like consistency), and add deep end details with painted swirls and shadows. To finish, swirl a little streak of our shimmering gels into your royal icing for a subtle sparkle that catches the light.
4 Must Try Party Treats!
Get the party started with these irresistible treats! We’ve rounded up our favorite summer-inspired treats like funfetti cake cones and chocolate s’mores cupcakes, and decorated sugar cookies that are perfect for any occasion . With a little help from our royal icing, fondant, and meringue powder, you can save time with our ready-to-use products and enjoy the celebration!
Mini Funfetti Cake Cones
One “soft serve” cone, comin’ up! A summer-inspired treat that screams pool party and backyard hangs, mini ice cream cones serve the perfect two-bite piece of cake. Fill your mini cones ⅔ of the way with funfetti batter and bake them at 325°F for 20 minutes. Pro’s tip: make sure to find the flat bottomed cones! That way you can make them stand on their own while baking.
For a sorbet hued swirl of our luscious buttercream, we blended our neon pink and peach gel food coloring. Unlike watery, liquid food coloring, our gels are super-pigmented and a little goes a long way! The secret to this ombre look? Use your darkest buttercream to mix up lighter shades! Add a dollop into white buttercream and you’ll achieve lighter hues all in the same tones.
Once your cones have cooled completely, pipe on your “soft serve” buttercream and top with edible glitter and nonpareils for that added shimmer and crunch!
4 Step S’mores Cupcakes
These glorious s’mores cupcakes are the ultimate remix to a classic flavor combo. We turned this classic upside down, and added our own special touch. Rich chocolate cupcakes dipped in chocolate melting wafers, and topped with graham cracker crumbs, then finished off with a torched meringue topping.. Yes, please! Our melting wafers are easy to melt and dry with a glossy finish – perfect for that irresistible snap to a soft and moist cupcake.
While the chocolate sets, mix up your marshmallow-y topping using our meringue powder! Our meringue powder is perfect for replacing any recipe that uses egg whites – buttercreams, royal icing, and of course, meringues. We know you’ll love the delicious vanilla flavor and the fluffy texture. Before you start, wipe down your bowl and whisk attachment with white vinegar to remove any residual grease (this will help avoid a deflated meringue). Then, beat the meringue powder with water on high speed until it is glossy and has tripled in size. Finally, fill your piping bag fitted with a large open round tip, and pipe your cloud of meringue onto the cupcakes. Finish with a light torch and set the mood with edible gold stars.
Marbled Fondant Sugar Cookies
Fondant decorated sugar cookies only require a handful of things: our ready-to-use fondant, gel food coloring, and cookie cutters! This cookie style is so easy to do, and we used the same cutters for the cookie and the fondant – perfect for kids to try themselves!
For this classic sugar cookie, we love the look of marbled fondant; a quick, easy and fun way to create a stylish looking treat. To create your own custom colored fondant, start by kneading white fondant until it is soft and pliable. Add a few drops of our vibrant gel food coloring, and continue kneading. Start by twisting together ropes of your colored fondant with white fondant, and gently knead together for a marbled look. Now, it’s time to roll! Use a small sieve to dust your counter with icing sugar or cornstarch, and roll out to an ⅛ of an inch.
Now you’re ready to cut out and top your delicious sugar cookies! Once your cookies have fully cooled, paint on a light coat of corn syrup, attach your fondant cut-out. Ta-da! You have a beautiful, fondant topped treat. To add a glittery fun touch, we sprinkled on a blend of our nonpareils and sanding sugar to add more texture and to elevate the final look. Basic, but never boring, cut out sugar cookies have an invite to any celebration!
Celebration Cookies!
Cookies always make the perfect gift for celebrating any moment big or small, and our ready-to-use royal icing is the life of the cookie party! We stacked bold colors, piped ultra fine squiggles, and played with polka dots for these simple designs with crisp embellishments.
Our ready-to-use royal icing is great to use as is, or simply mix in icing sugar for different icing consistencies. For a hybrid, look for a honey-like flow, and for detail, you want it to be like toothpaste. Once you’ve flooded your cookies, it’s time for those delicate, 3D details. For ultimate control, try filling your tipless piping bags with less royal icing! That way, you don’t have to apply as much pressure and you get more even and smooth lines.
For super pigmented hues like black and red, you might notice that lighter tones start absorbing pigments from these darker colors (aka color bleeding). Avoid this by letting your dark royal icing colors develop overnight; this also means you can use less gel color! For black, aim for a charcoal grey, and a light red for a true show stopping tone. Now that you’ve been gifted with these cookie tips and tricks, save precious time and get the party started!
Get Wild in the Kitchen!
Delectable donuts, surprise-inside cakes, sugar cookies.. Oh my! Our ready-to-use royal icing and buttercream turns your kitchen into a one stop destination for all things sweet, and sprinkles are always ready for a celebration. Decorate your next big bake with fondant details, and bring animal cookies to life with puffy details from cheeks to tails. It’s time to get wild in the kitchen with the whole family!
Simple Tips for Decorating Donuts
Dip dip, hooray! Making homemade donuts has never been easier; our ready-to-use royal icing is the perfect consistency to leave a shiny dip on your finished treats.
Try something new and create a marble dip! Pick any two colors of gel food coloring and swirl them into our ready-to-use royal icing for a mesmerizing, shiny glaze (be careful not to overmix). You could stop there, but why would you when you have sprinkles! Add another layer of texture with a dusting of sanding sugar and you’ll have pillowy soft donuts that taste as sweet as they look.
For a stunning watercolor effect, royal icing is your canvas, and gel food colors are your “paint”! Before dipping your donuts, create an ultra-white canvas by adding a few drops of white gel food coloring to royal icing, then start dipping. Once the glaze hardens, dilute your gel food colors with a bit of water and paint your treats from lightest to darkest for the most gorgeous rainbow effect.
How To: Color Your Own Fondant
Mix the perfect shade of fondant for your next baking project with gel food coloring and our ready-to-use fondant!
Start by kneading your white fondant before adding any color. A dab of shortening is the secret to a malleable consistency, but avoid using perishable ingredients like butter or margarine so your fondant doesn’t go rancid. Once you have a pliable consistency, add a few drops of our vibrant gel food color, and make sure you wear food safe gloves to avoid stained hands! Using a super concentrated gel food coloring is ideal for coloring fondant because a little goes a long way. It won’t change the consistency of the fondant, and the colors stay vibrant. Get creative and mix different colors for a custom shade!
Pro tip: make sure to have icing sugar or cornstarch nearby while rolling and cutting out your fondant, in case it gets too sticky (be careful not to use too much or it can cause rips and tears)!
Simple and Elegant Wedding Cake
When it comes to making a classic, all-white cake even more captivating, it’s all about texture. Create visual interest with buttercream waves, and add volume with piped shells around the borders. Tie everything together with modern details like a cascading chocolate drip and a custom sprinkle blend!
To start, beat our buttercream on low before stacking and icing your cake layers. You’ll end up with a texture that is perfect for icing, piping, and creating simple yet stunning designs. Create romantic waves by running the end of a spatula around the iced tiers; spatula icing is the perfect way to hide imperfections in your buttercream! While spinning your cake, keep your spatula steady and slowly move upwards in one continuous motion. Let your turntable do all the work for you!
For a stand-out drip with no yellow undertone, add a couple of drops of white gel food coloring to your white chocolate ganache. A chilled cake = the perfect drip! Make sure your white chocolate ganache is room temperature before you start dripping. Finally, it’s time to bring the bling! Add a spectacular trim to your tiers with a sprinkle blend of our sugar crystals, gold jimmies, and nonpareils.
Baby Shower Treats
Celebrate the newest member of the family with your favorite treats! Baby animal cookies make fantastic party favors, and in our opinion, the best way to do a gender reveal? A surprise-inside cake!
Building a secret sprinkle chamber is a lot easier than it looks. Simply use a small round cutter to cut out a hole in your second and third cake layer, and spoon in your favorite sprinkle blend. Cap it off with a circle cut out, and start icing. To decorate, use what you already have in the kitchen – cookie cutters! Add darling details with simple shapes cut out of fondant, and of course, finish your design with a sprinkle blend of nonpareils and edible stars.
Sugar cookies piped with fun and not-too-perfect details, this family of baby animal cookies were born to be wild! Whether you’re flooding with a honey-like icing consistency, or adding fine details with icing a little bit more stiff, meringue powder helps keep your royal icing stable. For cheeky smiles and chunky lettering, look for a consistency similar to toothpaste; these puffy details create lots of dimension and natural shadows. Soften super bright base colors by adding another color to tone them down, like a touch of ivory for a more muted color palette.
Pizza Cake: 8 Reasons to Smile
No matter how you slice it, a party isn’t a party without a pizza… cake!
To get this baking party started, add our rainbow nonpareils to your vanilla cake batter for a funfetti surprise. Be careful not to overmix! You don’t want the colors to bleed into the batter. Bake your cake in a 6-inch round pan, and let it cool completely before cutting your slices; cold cake = less crumbs!
Time for the best part, the buttercream! Get creative and play around with different piping techniques; each pizza cake slice is a blank canvas for your wildest buttercream dreams. French star tips are perfect for piping shells, ropes, and rosettes; open round tips create fluffy buttercream clouds and drops; experiment with petal tips to create waves and curls – the more piping tips, the better! Finish each slice with a touch of edible glitter and you guessed it.. more sprinkles!
Easy Isomalt Lollipops!
Homemade lollipops are simple yet delicious, and we have everything you need for this quick and easy activity! Isomalt is perfect for making crystal clear candy treats; you’ll want to have everything you need close by and ready to use. The candy making process moves quickly!
Here are five important steps to keep in mind:
- Clip a candy thermometer to your heavy bottomed saucepan, and stir 2 cups of our isomalt with a ½ cup of hot water until fully dissolved
- When your isomalt mixture reaches 280°F, add any gel color of your choice! To make your colors even brighter, add a drop of white gel coloring along with your desired shade.
- Once your mixture reaches 320°F, it’s time to start pouring! Line a baking sheet with a silicone mat and slowly pour your liquid isomalt to form perfectly round lollipops.
- Gently place in your paper straw, and sprinkle with our edible glitter!
- These sweet lollipops only take about 10 minutes to cool and harden completely.
These sweets are the perfect treat to build out that color scheme on the dessert table, or to give away as party favors!
How To: Build a Cookie Bouquet
We can’t get over these sweet and stunning tulips! Dewy petals and slender stems are details that require sturdy icing, so make sure to use an extra thick flood or hybrid consistency to combat any cratering. You can also use a scribe to help level out any puffy details in tight spaces.
Resist the temptation to move your cookies around right after flooding! After all that hard work you don’t want any cracks in your royal icing. If you still notice craters that wilt your design, try this: pipe a squiggle over the blank space before you start your flood – this will help support the heavy royal icing adhering to the cookie!
3D petals and swaying leaves really add movement to this interactive cookie set! Two-toned petals are another way to add dimension to your bouquet, so take the time to mix various shades of your royal icing. If you mix your gel food colors the night before you will really see the colors bloom to their full potential.
A cookie composition tip: choose floral shapes of varying sizes that sway in alternate directions. That way, you can stack them without covering too much of the cookie underneath it. A few free-standing leaves to layer on top of your final stems are all you need to complete this show-stopping cookie stack.
Whimsical Cookie Details
The number one rule in cookie decorating: don’t overthink it! Whimsical designs allow flexibility and a chance to develop your own style. As long as you have a simple base design, even a snail cookie can be elevated with lots of linework details!
For ultra-fine piping, make sure your royal icing is a little thicker than usual so it maintains its shape. If you want to branch out of your cookie-comfort zone, try layering linework! This technique is the fun-nest for creating bird’s nests; mixing in a touch of our meringue powder allows your icing to stiffen up without blending into itself!
Ready to finish with some darling details? Royal icing transfers are a simple way to add even more dimension to your cookies. Here’s the secret to puffy transfers: outline in a detail consistency then fill with a thick hybrid so transfers keep their thick shape! They’ll be super easy to peel off the acetate once they’re fully dry. Attach your transfers to your cookie using a touch of royal icing and adjust using your scribe so they are evenly spaced!
Simple Tricks for Lettering
If you’ve ever piped lettering, you know the biggest struggle is clean lines! We’ve all been left broken hearted from broken lines, squiggly messes, and flat lettering. Yes, we know practice makes perfect, but here are a few of our pro tips to speed up the process!
Tipless piping bags are the secret to ultra fine details. Snip the tip as much or as little as you like – you have full control! Make sure to only fill the bag one quarter of the way so you don’t strain your hands from having to squeeze too hard; your dominant hand should be squeezing from the top of the bag with controlled, steady pressure.
If you’re new to lettering, try gently etching in your message with a scribe or toothpick on your fully dried flood (this will act as a writing guide like we all used in elementary school)! Once your royal icing has attached to the cookie, lift and pull with consistent pressure. When you’re ready to stop your line, let go of the pressure, set down, and pull away! Pipe your lettering one stroke at a time, lifting off the cookie at the end of each stroke before connecting the next to avoid bulbs. Happy piping!
4 Steps to Shortbread
Buttery, melt-in-your-mouth rainbow shortbread, yes please! The perfect project for young bakers, shortbread is a simple recipe that can be made into any shape, and adapted to your taste. We love using our gel colors for baking because they’re guaranteed not to fade from the heat!
- To get this rainbow effect, divide your shortbread into four equal portions and color with our Lemon Yellow, Neon Pink, Purple, and Sky Blue gel colors.
- Next, roll out your dough into logs, and line them up on a piece of cling film from lightest to darkest.
- Carefully roll up your colors into a cylinder, and place this into a piping bag fitted with a large open star tip!
- Once you’ve piped and baked your rainbow cookies, it’s time to start decorating! Dip your rainbow cookies into white melted wafers and complete the look with a sparkly finishing touch.
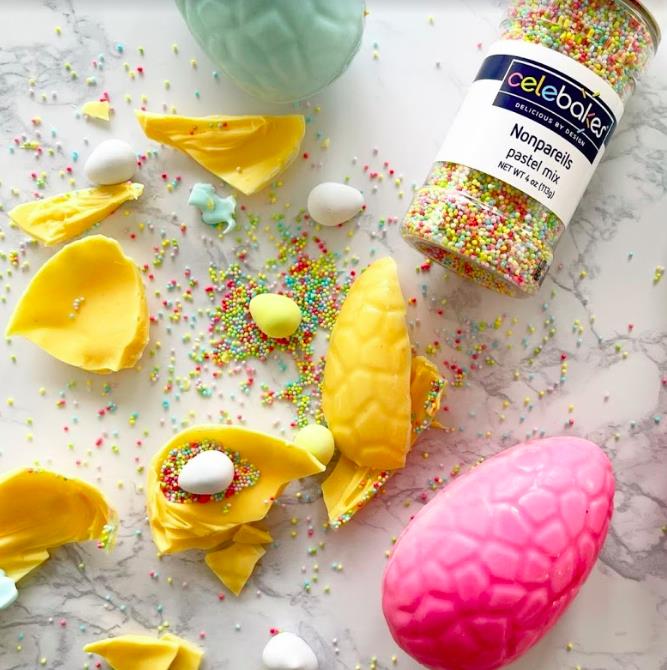
Simple Tips for Chocolate Eggs
For a smashing good time with the family, making and filling your own candy eggs is a great place to start. Our melting wafers come in a rainbow of colors, and are perfect for using in our chocolate molds. Your shells will come out glossy and ready to fill with sprinkles, candy, and even more chocolate!
Before you get started on your homemade eggs, here are a few tips to keep in mind!
- There’s no need to grease our candy molds, as long as they’re clean and dry, the shells will release.
- Since it’s always better to be safe than sorry, simply wipe your cavities to remove any residual grease with a touch of vinegar on a paper towel.
- Our melting wafers come in a rainbow of colors, but if you want to customize your eggs, try coloring white melting wafers with our dry food coloring! A little goes a long way, and dry coloring offers more control over your finished creations.
- Before you start pouring, make sure your chocolate isn’t too hot! This can warp your molds and you’ll be left with a cracked mess.
If your melting wafers become too thick, gently reheat in the microwave or add paramount crystals! Start by adding 1 to 2 tablespoons per pound of melting wafers until you reach your desired consistency!! Since our paramount crystals are odorless and tasteless, you’ll be left with creamier candy that’s easier to work with.
How to Make Melting Wafer Shells
It’s never too early for Easter eggs! Our melting wafers don’t require any tempering – just melt in the microwave and hop to it!
Start by filling each cavity of the mold with a tablespoon of your melted wafers, and use the back of a chopstick or butter knife to spread around evenly. Once it has set, make sure to do a second layer! This ensures a strong shell that will be smash-worthy once filled. After your shells have hardened and are removed from the molds, fill one half with anything your sweet tooth desires; from sprinkles, candy, chocolate, or even pieces of vanilla cake!
The trick to sealing your shells? A warm plate from the microwave! Melt the edges of your second shell on your still-warm plate, and immediately place it onto your other filled half. It only takes a few seconds to set, and you’re ready to start smashing!
How to Elevate Easter Cookies
Elevating classic Easter cookies is all about details. Our stainless steel cookie cutters stay sharp and are the secret to clean cut cookies. Whether you’re cutting out simple or complex designs, always make sure to chill your dough after rolling AND before baking. That way, your cookies won’t spread in the oven, and will always come out in perfect shapes!
Once your cookies are baked, time to flood them. Marbling your royal icing is the best way to use up that collection of royal icing in the freezer. Use a spoon or piping bag to layer together your favorite colors, and you’re ready to start dipping! Our meringue powder helps create royal icing swirls that will stick to your cookie, leaving you with a marble-lous effect.
When you’re ready to start decorating, our tipless piping bags will help you achieve those fine, jazzy lines and fun abstract patterns. A small snip will give you ultimate control over layering linework, or a fun v-shaped cut turns a simple carrot top into a 3D leaf! Tipless piping bags are perfect for any style of cookie decorating because of the flexibility, and you know we love a multi-tasking tool!
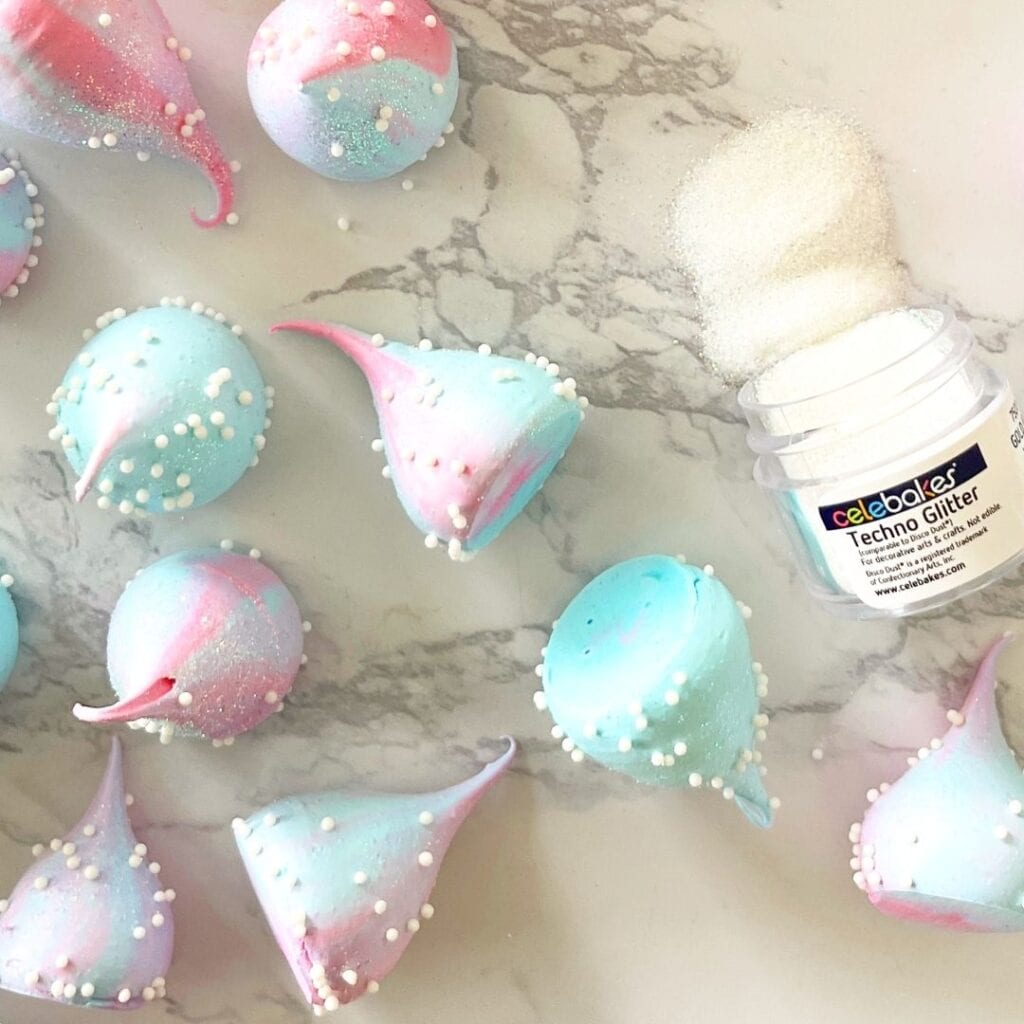
Easy Meringue Kisses
Good things come in small packages, they say, and these meringue kisses are no exception. Delicious on their own, or as a gorgeous garnish for your other desserts, kisses are oh so versatile. Sweet, crisp, and light as a cloud, they add texture to other treats and a pop of color!
The secret to these piped bite-sized beauties is our meringue powder; you’ll get those pretty peaks that don’t deflate or crack in the oven. Whether you’re looking for dreamy pastels or striking shades, make sure to gently whisk in your food coloring into your meringue.
To add a bit more texture to these light-as-air kisses, a sprinkling of nonpareils is ideal. Bake these low and slow in the oven, and when they’re crisp and cooled, finish with a mist of edible glitter!
Marbled & Shimmering Strawberries
Is there a more fitting treat to celebrate the ones we love than beautiful dipped strawberries? We’re taking this classic Valentine’s dessert to the next level though.
Create a marble effect on your berries with melting wafers. Melt your first color into a bowl and drizzle your second color into your bowl. Don’t mix! Simply dip your strawberry and let them dry for that chic marbled look.
Next, try a little sparkle with our edible glitter, and you have a gift worth the splurge. Even if you’re just solo baking, don’t forget to treat yourself to a little glitter and gold. Our edible glitter and shimmering nonpareils pair perfectly with just about any treat you make!
Tips for Cookie Painting
Turn sugar cookies into canvases! To create the ideal surface for painting, start by following your sugar cookies with royal icing. Pro tip: add some corn syrup to your icing and dry your cookie in front of a fan so it dries with a nice sheen. This also acts as a barrier for your “paint”.
Once your canvas has dried, you’re ready to let your inner artist shine (this activity is also great for the little artists in your house!). Combine a few drops of our gel colors with clear vanilla extract and you’ve got your “paint” ready to go. Our gel colors are super saturated, so a little goes a long way to create your palette. Finding the right consistency can be a bit tricky though, so try mixing a few different colors before starting. Perfect for the whole family, this cookie art project lets you get creative…and there’s a sweet treat at the end!
Mini Cakes: Get Creative With Buttercream
I dream, you dream, we dream of buttercream…mini cakes!
We may not be baking large, elaborate cakes these days, but mini cakes are the perfect sweet treat to enjoy for an at-home celebration with the family.
Pro’s tip for cutting your mini cake layers: freeze your sheet cake before cutting out your shapes. This ensures a clean cut and less crumbs while decorating!
Now onto the fun part: decorating. Whip out the buttercream and start piping! Get creative with your piping tips to add texture and that wow-factor. Combine bright buttercream colors and a neutral tone to achieve a chic cake design. We LOVE shades of pink with a subtle grey. To achieve rich, saturated tones, our gel colors are key!
Next, create volume and texture in between layers by using different piping tips; open and closed star tips are perfect for the job. We love the look of a “naked” cake to show off those velvety buttercream layers. For a more traditional look, use a cake comb to create a stripe design. Once your first layer of buttercream is chilled, carve out ridges with your comb, and fill with any color your heart desires. Then, smooth it all together for a flawless finish!
Floral Cookie Designs
We can never get tired of flirty florals. To start, bake your favorite batch of sugar cookies and flood with royal icing. Once you’ve flooded and dried your cookies, pipe your design with a detail royal icing to create the outlines of your flowers; a toothpaste-like texture is perfect for the job.
If you have leftover royal icing from your last batch of cookies, you can create a royal icing “palette” by piping swatches of different colors, and letting them dry completely overnight.
Add delicate details with thick and puffy royal icing transfers; pipe your designs onto a piece of acetate, and peel away when fully dried! Using our meringue powder in your royal icing ensures a glossy sheen, making the perfect canvas to decorate your cookies. To complete your pretty petals, simply dip your brush into water and start painting your own garden!
Hand Pies
Our royal icing is perfect for recreating that nostalgic look and taste of the toaster treats we all loved as kids. Simply add some icing sugar to your royal icing to create a thicker consistency for piping! You can assemble and freeze these pies (unbaked) for up to a week; perfect for when you need to whip up some treats at the last minute! The secret to any crust is to always use egg wash, so don’t skip this step! This ensures those golden brown, crispy edges. You can almost hear that first bite before you take it, YUM!
Holiday Celebration Cookie Set
The look on your loved ones’ faces when you serve up a tray of these holiday cookies? The BEST. You can recreate this festive color palette with our gel food colors in bright reds, pinks, and holiday greens, plus a touch of ivory helps bring some warmth to cooler tones! Make sure to work with your cookie dough in batches to keep it cold; this is the secret to clean cut designs!
Cozy Fall Cookie Set
Cozy up to cool tones with warm accents using super-saturated Celebakes gel food colors! Allow your icing to develop overnight, and add deep hues like purple, red, and black to mute burgundy gel or to slightly change hues. Eye catching tones are achieved by adding a couple drops of ivory to brighten up deep and vibrant hues. Build that cookie confidence with lots of practice and piping patience, and transform your seasonal cookies by focusing on the details.
Arrival of Winter Cookies
Today’s cookie forecast calls for eye-catching tones and sweet designs, and we are ready to celebrate a new baking season! For icy blues and evergreen hues, the only Celebakes gel food colors you’ll need for this cool set are royal blue, sky blue, and pine green. Get ready for some color blocking with a hybrid consistency in your royal icing. To achieve a seamless flat design when using multiple colors, stack your freshest icing at each color threshold so it dries evenly!
Oreo Pops
Cookies and cream on a stick dipped in your favorite chocolate wafers, these holiday pops are a must-try with the kids! Our quick tip for a secure stick: soften the cookie’s cream filling with a few seconds in the microwave! Wiggle in your stick, being careful not to push too hard so the cookie doesn’t crumble. You want to completely coat your cookie for a smooth finish, so make sure you melt enough wafers in a microwavable cup in 20 second increments. Get creative with your details using Celebakes Jimmies for a sweet stitched design, or blend your favorite nonpareils to achieve that holiday look!
Sheet Cake
So sweet and easy, we love the fact that you can serve a sheet cake in the same dish you bake it in. To spark some creativity, use your favorite cookie cutters as stencils for your buttercream! Here’s a pro’s tip on how to nail this cool ombre effect with your buttercream: Mix up a bigger batch of your darkest shade, and use that to color your lighter buttercreams. You’ll achieve the same tone, just in different shades! Finish with a flurry of sprinkles and you’re ready to serve an icy sweet slice!


Marshmallow Pops
These marshmallow pops are fluffy, light and the perfect canvas for a sweet marbled coating. Celebakes melting wafers offer a smooth creamy texture for all your treat making needs. They also provide the same consistency every time. Dip your pops in Celebakes colored melting wafers and sprinkle with our shimmering white sugar crystals for the final touches. Our sugar crystals don’t dissolve, which means you won’t lose that sparkle to your pop!
Chocolate Bark
As delicious as our creations are, sometimes we can’t finish them all! Chocolate bark is a sweet way to remix those leftover treats. Crushed cookies, broken macarons, candied flowers – the possibilities of toppings are endless! Celebakes colored melting wafers are perfect for the job – easy to melt for a consistent result every time. A total sensory treat, bark checks off all the boxes by being sweet, salty, crunchy and decadent!

Apple Harvest Cookie Set
We picked our Celebakes super red, leaf green and brown gel food coloring to create this a-peel-ing cookie set! A common struggle with nailing details is getting that perfect consistency AND deep color. Here’s our little secret: let your cookie icing colors develop overnight to achieve those rich hues and aim for toothpaste-like consistency to add textured details and dimensions!
The trick to achieving deep darker tones in to mix your cookie icing the day before your decorating session and let your gel food coloring develop overnight. Celebakes gel food colors are perfect for cookie icing: just a few drops are needed to achieve rich tones, so you don’t need to worry about your icing getting too loose!
Caramel Candy Apples
Caramel candy apples are the best of both worlds; a juicy crunch wrapped in am ooey gooey dip. Yum! We mixed things up with these candy apples and coated them in colorful candy melts. A microwave is all you need! Let the kids pick their favorite colors and try their hand at creating dizzying drizzles. Make sure your caramel has stiffened up before dipping into your candy melts; you want to build layers of texture and shiny colors.
Decorate your apples while they’re still wet! You do not want to lose any of those sprinkles. If you notice your candy melt is getting too thick, add some of Celebakes paramount crystals to your dip, and pop it back in the microwave for a few seconds to loosen things up!


Meringue Pops
Meringue pops are really having a moment in the baking world, so why not try them out for yourself! The secret to maintaining a stable consistency in your meringue is to use Celebakes meringue powder; its a perfect egg white substitute. Your meringue will be less prone to changing due to the environment, such as heat and humidity, which means light and crisp meringues. Do not forget the golden rule of prepping for meringues: be sure to wipe all your tools bowl and attachment) with vinegar get rid of any grease grease makes meringue deflate!).
Mini Cakes
If you want to get creative with cakes, no need to go big! Mini cakes are a unique twist to a traditional cake slice and the perfect size to enjoy as a family. Our Celebakes buttercream has a buttery almond flavor that will have everyone at the table asking for a second cake. Beat your buttercream on low speed before filling your piping bag. You can also mix in any of our Celebakes gel colors into our Whimsical White Buttercream and it will still hold its shape. Play around with different tips and techniques, and practice on parchment if you want to try a new piping design! To create abstract nonpareils come in different colors, so you can mix and match for any theme!

Rice Krispies Pops
We elevated the classic rice krispies treat into something that is fun to eat in the sun! Avoid sticky hands by making Rice Krispies pops and dipping them in our colored melting wafers. Since our melting wafers come already colored, you can save time by skipping straight to the fun part… decorating! Just melt your colored wafers in the microwave, give it a stir, and you’re ready to start dipping and drizzling. With so many colors to choose from, you’ll be able to mix different colors to create that perfect shade and customize any celebration!

Sugar Cookie Sandwiches
What’s even better than a batch of freshly baked sugar cookies??? Transforming them into sugar cookie SANDWICHES! If you’re short on time or simply can’t be bothered to make your own buttercream, our rich velvety buttercream lends a sweet almond taste and comes in so many gorgeous colors. We love using sprinkles to bring a pop of color as an accent to this color scheme. Mix and match your sprinkle blends with different colors, textures, sizes and shapes! You don’t need much to get everyone ready to celebrate and these treats will bake you proud!

Farmer’s Market Cookie Set
Fresh from the farmer’s market, you can find cookie inspiration anywhere! The best part about outdoor markets are all of the rich and vibrant colors on display. Gorgeous colors make your cookie sets stand out; we use our gel food coloring to achieve these rich and true-to-color designs. The perk of using gel food colors? A little goes a long way! A couple of drops will achieve those tones without loosening up your icing or leaving a funky aftertaste!

Home Sweet Home Cookie Set
Sugar cookies are a perfect way for kids (and yourself!) to unleash some creativity! With some practice and a few pro tips, you’ll be on your way to creating these too-pretty-to-eat masterpieces. Achieve a shiny, smooth base and detailed lines by using different cookie icing consistencies for your designs. Our meringue powder is perfect for the job! Unlike traditional egg whites, meringue powder helps create a stable and sturdy icing that is easy to color and decorate with! Practice makes perfect for piping skills, so why not start now?
